Sarah Ferstel
When I was studying abroad, I remember my Italian flatmate's total confusion when I brought sweet potatoes home. My Chinese flatmate, on the other hand, was as excited as I was to have them. We threw them in the oven and then ate them with a spoon right out of the skins. Simple, delicious, and very nutritious.

Down here in Louisiana, and probably in other parts of the south, you can often find sweet potato casserole with marshmallows on Thanksgiving and holiday tables. I hunted (i.e. Googled) for a cupcake equivalent, and what do you know - it exists!

The cake part was easy enough, but roasting little mounds of mini-marshmallows let me express pryomaniacal desires I didn't know existed. Thank goodness my step-mother isn't bothered if you start marshmallow fires in her oven.

Whoops!


The second batch came out just right, but they were a pain to transfer to the cupcakes.

Cute, hunh?


The overall taste of the cupcake with the "frosting" was okay, but nothing really special. I prefer the casserole or sweet potato pie.

My nephews really liked them, but I think they'd eat brussell sprouts if we put marshmallows on top.

What did I learn from all this?

1) Marshmallows go from lightly toasted to flaming mounds of madness in about 2 seconds.

2) Young boys like sugary treats.

3) Not every dessert dish should be cupcake'd.


Sarah Ferstel
Happy New Years, everyone!

I'll post all about my holiday food adventures in separate posts after this one, but I want to use this entry to brag about my presents. Yes, I realize it's in poor taste and my mother always pooh-poohs materialistic bragging, but too bad, Mama! I'm an adult now which means I can eat dessert before dinner (one of my consistent childhood plans for adulthood), and I can show off my presents.

In no particular order, here are my kitchen-y/foodie prezzies:

1)


The book My life in France by Julia Child with Alex Prud'homme - I'm halfway through this delightful little book which celebrates France and its cuisine all through Julia's voice, which is always filled with joie de vivre. It's a really fun read.

2)
Mastering the Art of French Cooking, Vol. 1

The cookbook Mastering the Art of French Cooking by Mme. Child and friends - I know it is surprising that I don't already own this cookbook, but I've always been more a fan of Italian cooking than French. One of my resolutions for this year is to acquaint myself with many of the recipes and techniques in this book. Skimming through the book, I noticed a lot of recipes call for butter, which is always a plus!

3)
Silicone Rainbow Whisks
A silicone rainbow whisk by Kuhn Rikon - The colors may seem tacky to some, but they remind me of Lisa Frank and gay pride - so, whee!

4)


Another cookbook Cooking up a Storm: Recipes Lost and Found from the Times-Picayune of New Orleans - This is a collection of lost recipes sent in from Louisiana residents and chefs after hurricane Katrina (and probably Rita, too). There's a really nice mix of recipes in here and I like that some are family recipes, while others are restaurant favorites. Each recipe comes with a little story, which, as a history-lovin' kind of nerd, I love.

* Please ignore some of the bitchy comments made by food snobs on the Amazon site about this book. Some people's mamas didn't raise them right.

5)

HVT4242

I bought a proper dining room table with matching chairs! No more eating off my childhood desk/diaper table for me. It's small with drop down leaves and two chairs, which is perfect for the dry wall, echo box I call home. Precious, ain't it?

Okay, now it's your turn to show off. What did Santa/Hanukkah Harry/Kwanzaa Kimmy/Atheistic Al bring you?

Stacie the Baker
Hello world!

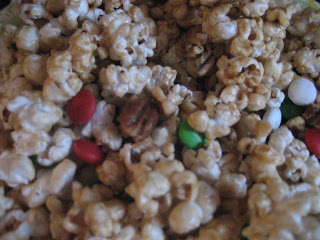
It is with great joy and honor that I present to you my very first post on Sarah, Shelly and Brett's illustrious cooking blog. I enter this format with much trepidation, so please do not pulverize me in the comments section (or I'm afraid my ego will never let me come back). However, needless to say, I'm pleased to bring you a scrumptuous, little recipe for caramel corn!

To be totally honest, I'm kind of bummed this is my first post. I was hoping for something a little more culinarily challenging, but when you've procrastinated past the point of apologies, this is what you're reduced to. So, CARAMEL CORN it is!


Ingredients
12 cups of popped corn
1 cup of roasted pecans
1 cup of M&Ms (optional)
1 stick of unsalted butter
1 cup of packed light brown sugar
1/4 cup of light corn syrup
1/2 tsp. salt
1/2 tsp. baking soda
1 large brown paper grocery bag


I'd like to preface the instructions by stating you can use whatever kind of popcorn you'd like. Precooked popcorn, microwave popcorn, stovetop cooked popcorn. I personally cooked my corn on the stovetop in oil (cheapest!).

Instructions
1) Place popcorn and roasted nuts in brown paper grocery bag. Shake it up a little to combine (If you'd like, you can add pretzels too!)

2) Melt butter in microwave for approximately 1 minute. Add brown sugar, corn syrup, and salt and microwave for 2 minutes. Stir the mixture for about 30 seconds to a minute, and then placed back in the microwave for 2 more minutes. The mixture will bubble and boil. Do not be alarmed!

3) Add baking soda to sugar mixture. It was get foamy, but once it starts to do this... carefully pour it on top of the caramel corn. Fold over the paper bag and start to shake!

4) Throw it back in the microwave for another minute. Take it out and shake again. Then another minute in the microwave. Open the bag, add the M&Ms and shake for 30 seconds one last time!


Voila! Just spread it over a cookie sheet and let it get crunchy! You can break it up and start munching on it within 5 minutes.

Here's an idea: For an inexpensive Christmas gift, I put mine in Christmas-themed Chinese take-out boxes. Good for coworkers or neighbors!


Either way, this is such an easy snack to make... I hope that you enjoy!
Shelly
Okay. . . maybe I'm the only one here, but I'm sort of wishing that I had some of the recipes from last weekend's party. . . so if you're reading this, you should post your party food recipe. In the meantime, here is the recipe for the dish that I brought. I'm too lazy to get up and retrieve the recipe for the Chocolate Pecan Pie, but if somebody wants it, let me know, and I'll go dig it out. I have to say that I did like this recipe, but it seemed like a lot of work for what it was. It's a shame frozen pie shells don't come in a mini size. . . Then again, maybe I should not attempt to do this sort of thing after working a late shift at the library.

Leek and Onion Tartlets

2 T. butter
1 onion, thinly sliced
1/2 tsp. dried thyme (I didn't have thyme, so I used Herbes de Provence)
1 pound leeks, thinly sliced
2 ounces Gruyère or Emmenthal cheese, grated (I live in Podunk, America, so I had to use Parmesan)
3 eggs
1 1/4 c. light cream
pinch of freshly grated nutmeg
salt and ground black pepper

For the pastry
1 1/3 c. all-purpose flour
6 T. cold butter
1 egg yolk
2-3 T. cold water
1/2 tsp. salt

1. To make the pastry, sift the flour into a bowl and add the butter. Using your fingertips, rub the butter into the flour until it resembles fine bread crumbs. Make a well in the center of the mixture.
2. Beat together the egg yolk, water and salt, pour into the well and combine the flour and liquid until it begins to stick together. Form into a ball. Wrap and chill for 30 minutes.
3. Butter six 4- inch tartlet pans. On a lightly floured surface, roll out the dough until 1/8 inch thick (which I found to be an IMPOSSIBLE task), then using a 5 inch cutter, cut as many rounds as possible. Gently ease the rounds into the pans, pressing the pastry firmly into the bottom and sides. Re-roll the trimmings and line the remaining pans. Prick teh bottoms all over and chil in the refrigerator for 30 minutes.
4. Preheat the oven to 375. Line the pastry crusts with foil and fill with baking beans. Place on a baking sheet and bake for 6-8 minutes, until golden at the edges. Remove the foil and beans and bake for another 2 minutes, until the bottoms appear dry. Transfer to a wire rack to cool. Reduce the oven temp to 350.
5. In a large frying pan, melt the butter over medium heat, then add the onion and thyme and cook for 3-5 minutes, until the onion is just softened, stirring frequently. Add the thinly sliced leeks and cook for 10-12 minutes, until they are soft and tender, stirring occasionally. Divide the leek mixture among the pastry crusts and sprinkle each with cheese, dividing it evenly.
6. In a medium bowl, beat the eggs, cream, nutmeg and salt and pepper. Place the pastry crusts on a baking sheet and pour in th egg mixture. Bake for 15-20 minutes, until set and golden. Transfer the tartlets to a wire rack to cool.
Shelly
If I've never mentioned it, the best recipes are never my own. Again, this one comes from my Mom-mom. It's one that she's cooked for years, and, for some reason, she thinks that Jared's the only one who likes them. . . So, she makes extra for him (spoiled brat) but not for the rest of us. So, this year, I decided to make a batch for myself. I'm sure that I'll bring most of them to the Cookie Swap at the library. It's going to be next Saturday at 10:30 if you want something to do that morning. We're also making beeswax candles. Just bring some cookies, your recipe, and a sense of fun! Anyhow, when we were eating Thanksgiving dinner, I asked Mom-mom for this recipe. She mailed it to me this week, and I noticed (I guess because it was on her ice cream recipe too) that she always writes "Good Luck" on the bottom of her recipes. I wonder if she thinks that the recipes are that hard - or that I'm that awful of a cook. Anyhow, these are awesome and are well worth the work. This does make a pretty big batch, so if you're eating them yourself, you may want to half it.


Peanut Butter Balls


1 24 oz. package of Chocolate Almond Bark
(for reasons which I will demonstrate later chocolate chips are not an acceptable substitute)


1 stick butter
2 1/2 c. creamy peanut butter
1 box powdered sugar (or just over 3 1/2 cups)
3 c. Wheaties or corn flakes or Special K or whatever kind of generic tasting cereal you have on hand, crushed

In a bowl mix all ingredients except the Chocolate Almond Bark.
If the mixture is soft, refrigerate it before you form the balls. . . if you used too much powdered sugar, feel free to roll away.

Melt the bark and dip the balls into the chocolate. Cool on waxed paper and then return them to the fridge (or freezer if you're working on them in advance).


This is what happens when you try to use chocolate chips. Obviously, chocolate chips would be an awful idea. However, tonight, I'm sleepy. I didn't have the recipe with me at the store, and I guessed chocolate chips. Lesson learned. I will be forced to bottle this and use it on ice cream. The important thing to remember as a chef is that sometimes, you have to make sacrifices.


Shelly

One beautiful fall day not too long ago, my ENT suggested that I have my tonsils out. Trusting his knowledge and theoretically sage advice, I decided to do so. I warn you now. . . do not EVER trust a medical professional who wants to rip your tonsils from your body. This hurts very very very much. After two weeks of not being able to eat and actually enduring stomach cramps due to impending starvation, I am finally (somewhat) normal. The funny thing is, the whole time that I was slowly starving, I kept thinking about food, and watching the food network, and flipping through cook books. Maybe it was a coping mechanism, or maybe it's the impending holidays. . . but I couldn't help it. So, I emerged from my ordeal with a little time on my hands and a strong desire to eat pizza, sushi and onion rings (don't ask).

I decided to skip the onion rings and make cookies instead. Lately, I've made my fair share of deserts. Someone in the house, who isn't me, has an insane sweet tooth. Typically, we do pies - chocolate pies. I could make a chocolate pie in my sleep. But this time, my desire to recreate something so simple and elemental won through. I was lazy and just used the Nestle Toll House recipe. I'm going to cheat. Instead of copying it down, you can go here. That's not too much to ask is it? http://www.verybestbaking.com/recipes/specialty/nth-detail-occc.aspx Or am I supposed to actually type out the whole recipe? That would be a huge waste of time when there's cooking to do. Here's the verdict. They turned out okay. . . decent. . . edible? There definitely has to be a better chocolate chip cookie recipe out there. And I know that there are definitely better chocolate chips. Who would have thought that Nestle chips are so inferior? The cookies tasted entirely too sweet. The point is, though, to go out there and make cookies!
Okay, maybe I'm getting carried away. I mean, I haven't done a day's work in about two weeks, so it's really no surprise that by this point, I've decided to wash five loads of laundry, make cookies, make homemade ice cream (my grandma's recipe - definitely worth sharing later), make a slow cooker full of potatoes, carrots and turkey, and contemplate the possibility of sweet potato casserole. All the while wondering who is going to eat this since the fridge is already full of homemade arepas, spaghetti sauce, burgers, and enough dollar general cookies to choke a horse. Oh well, c'est la vie.
Sarah Ferstel
Ciao, ragazzi!

As promised, I managed to wrangle someone (thanks, Ilya!) into taking pictures of me while I made homemade pasta.

I was going to write a little something about the history of pasta, but it turns out that everyone's version of this history depends on how you define "pasta" and whether you are Italia-centric or not.

There are a variety of ways to make homemade pasta, but I'm going to show you the simplest way I found. Aren't you glad?


Ingredients:

2 eggs
1 cup of flour (I used the same flour that I used to make cupcakes, but please let me know if there is some better, more magical pasta flour that you've used)

Equipment:

1 pasta maker (aka Pastalina, my darling hunk of metal)
kneading mat (optional, but oh so handy)

Step one:

Dump the one cup of flour onto your kneading surface (which should be clean and dry) and make it look like a little Mt. Vesuvius. In a small bowl, beat the two eggs together.


Now, pour the beaten eggs into the volcano. Using a fork, mix the eggs and flour together on your surface. You're going to make a mess - get over it!


At a certain point, put aside the fork (I know, it's hard, but you can do it) and finish mixing the egg and flour by hand.

*Do not put your fingers in your mouth after touching the raw egg. That is a no-no.

2) Once the ingredients seem evenly combined, start kneading the dough. You'll need to do this for about 5 minutes.


Kneading is hard work!


Check out my awesome technique!


If you are unfamiliar with how to knead pasta dough, or any dough, you can check out some techniques online. A quick Youtube search will bring you quite a few results. Make sure to look for "how to knead pasta dough" or something similar. Otherwise, you'll find techniques on how to knead dough for breads that rise. You don't want that.


My basic kneading technique involves pushing the dough with the heel of my hand across the surface of the counter, turning the dough, kneading, turning, kneading, etc.

The recipe calls for kneading the dough for 8 minutes, but I found that 5 minutes of kneading worked well. The whole point of all this kneading is to "strengthen the gluten" or to make a dough that won't tear in the pasta maker.

When your dough is completely kneaded, you should be able to stretch out the dough (like I'm doing in the picture below) without tearing the dough.


Next, cut the dough into 3 equal pieces and then thin them out by stretching them until they are about 1/4 inch thick.

When using a pasta maker, always set the rollers at the widest setting first.


Pastalina has "7 settings of wonder" and I put the dough through setting #7, the widest, first and then turned the crank to run the dough between the rollers.


Next, I set the rollers to #6 and put the dough through again, and so on until I got to setting #1.

Eventually, your dough will get very thin and very long.


You could leave this out to dry to make lasagna or cut it up and make ravioli, but I wanted some fettuccine so I ran it through Pastalina's 'sketty-side.'

(Yeah, I realize it says 'Al Dente' on Pastalina. Apparently, Al is Pastalina's ex-boyfriend and she doesn't really want to talk about him or how much she regrets this "tattoo.")

And then layed out each individual strand of pasta to dry on paper towels.


Fresh pasta can lay out anywhere from 10 minutes to 24 hours in fairly dry conditions (say, an A/C'd Louisiana apartment in October), but after it is dried you'll need to store it in an airtight container.

To cook, simply throw the pasta into a pot of boiling water (no oil) for about 2-4 minutes depending on how al dente you like your pasta.

Buon appetito!